Run VPN on OS10
My Configuration
Dell 4112F-ON
    Dell EMC Networking OS10 Enterprise
    Copyright (c) 1999-2020 by Dell Inc. All Rights Reserved.
    OS Version: 10.5.0.4
    Build Version: 10.5.0.4.638
    Build Time: 2020-01-30T21:08:56+0000
    System Type: S4112F-ON
    Architecture: x86_64
    Up Time: 2 days 03:54:07
CentOS
    [root@centos ~]# cat /etc/*-release
    CentOS Linux release 7.6.1810 (Core)
    NAME="CentOS Linux"
    VERSION="7 (Core)"
    ID="centos"
    ID_LIKE="rhel fedora"
    VERSION_ID="7"
    PRETTY_NAME="CentOS Linux 7 (Core)"
    ANSI_COLOR="0;31"
    CPE_NAME="cpe:/o:centos:centos:7"
    HOME_URL="https://www.centos.org/"
    BUG_REPORT_URL="https://bugs.centos.org/"

    CENTOS_MANTISBT_PROJECT="CentOS-7"
    CENTOS_MANTISBT_PROJECT_VERSION="7"
    REDHAT_SUPPORT_PRODUCT="centos"
    REDHAT_SUPPORT_PRODUCT_VERSION="7"

    CentOS Linux release 7.6.1810 (Core)
    CentOS Linux release 7.6.1810 (Core)
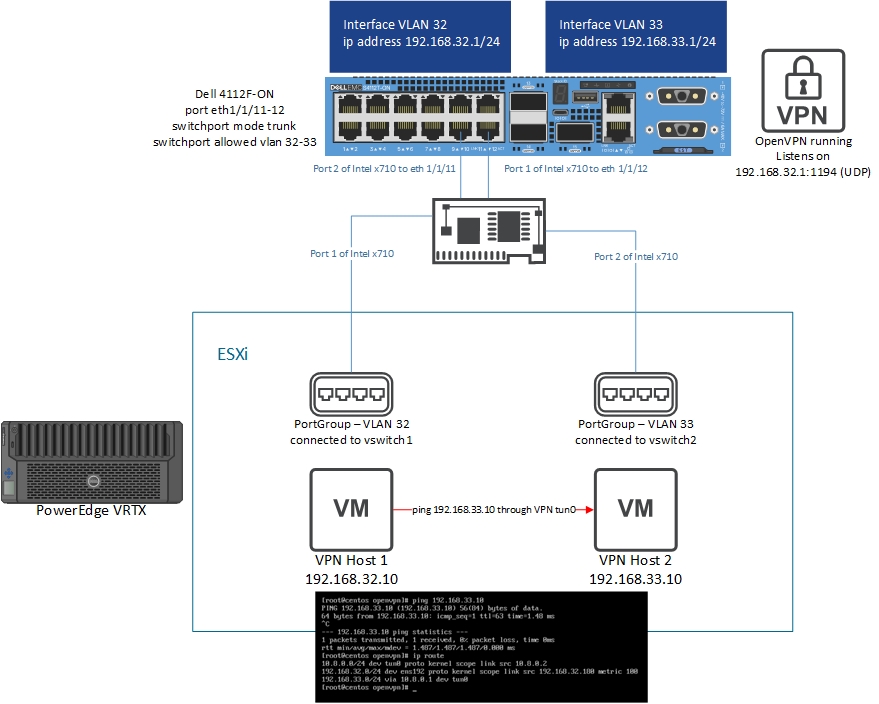
Testing Topology
Research Sources
NPU Interface Problem
The one big gotcha with doing this is that when you drop to the command line in
OS10 and do a ip a s, the interfaces you see that look like physical interfaces
ex:
13: e101-001-0: <BROADCAST,MULTICAST,UP,LOWER_UP> mtu 1500 qdisc multiq master br32 state UP group default qlen 1000
    link/ether 50:9a:4c:d6:0a:71 brd ff:ff:ff:ff:ff:ff
14: e101-002-0: <BROADCAST,MULTICAST> mtu 1500 qdisc noop master br1 state DOWN group default qlen 1000
    link/ether 50:9a:4c:d6:0a:72 brd ff:ff:ff:ff:ff:ff
15: e101-003-0: <BROADCAST,MULTICAST> mtu 1500 qdisc noop master br1 state DOWN group default qlen 1000
    link/ether 50:9a:4c:d6:0a:73 brd ff:ff:ff:ff:ff:ff
16: e101-004-0: <BROADCAST,MULTICAST> mtu 1500 qdisc noop master br1 state DOWN group default qlen 1000
    link/ether 50:9a:4c:d6:0a:74 brd ff:ff:ff:ff:ff:ff
are not actual physical interfaces. Under the hood the operating system is actually
using tap interfaces. Inside the switch there are two processors - a regular x86
processor and a separate processor called the Network Processing Unit (NPU). The
interfaces are connected to the NPU. Most traffic that comes in on the physical interfaces
managed by the NPU does not flow up to the x86 chip. This means that if you do
a tcpdump on one of the interfaces you see in ip a s you will see very little.
In fact, the only traffic you will see is management traffic which is handled
by the Linux kernel.
This means if you want to set up a VPN you have to have a way to make sure all the traffic is visible to the Linux kernel. Fortunately, there is a way to make this happen. VLAN interfaces are virtual and subsequently are handled entirely by the Linux kernel. In fact, VLAN interfaces actually show up under the hood as bridge interfaces:
29: br32: <BROADCAST,MULTICAST,PROMISC,UP,LOWER_UP> mtu 1500 qdisc noqueue state UP group default qlen 1000
    link/ether 50:9a:4c:d6:0a:a1 brd ff:ff:ff:ff:ff:ff
    inet 192.168.32.1/24 brd 255.168.32.255 scope global br32
       valid_lft forever preferred_lft forever
    inet6 fe80::529a:4cff:fed6:aa1/64 scope link
       valid_lft forever preferred_lft forever
41: br33: <BROADCAST,MULTICAST,PROMISC,UP,LOWER_UP> mtu 1500 qdisc noqueue state UP group default qlen 1000
    link/ether 50:9a:4c:d6:0a:a1 brd ff:ff:ff:ff:ff:ff
    inet 192.168.33.1/24 brd 255.168.33.255 scope global br33
       valid_lft forever preferred_lft forever
    inet6 fe80::529a:4cff:fed6:aa1/64 scope link
       valid_lft forever preferred_lft forever
These two correspond to interface vlans 32 and 33. By using VLAN interfaces you can tie the VPN to these interfaces and everything works just fine. You just place any associated physical interfaces as access VLANs or trunks with the appropriate allowed VLANs.
Installing OpenVPN as a Server on the 4112F-ON
Note: I ran a VPN server on my switch, but you could just as easily make the switch a point to point VPN gateway connecting to a PFSense instance such that anything that can reach the switch could participate in a multipoint network.
On the 4112F-ON:
- Enter configuration mode from user mode by running
enand thenconfig <enter> - Run
ip name-server 192.168.1.1to add a name server. - Run
write memin enable mode to save your configuration changes. - Run
system bash - Before continuing, make sure that the time is correct on the device. WARNING If you do not do this and you generate certificates, none of the encryption will work and you will have to recreate all of your certificates!
- Run
sudo apt-get install -y openvpn vim. I installedvimbecause I don't hate myself. - I used this script from git.io/vpn to install OpenVPN. Having done the entire thing manually before, I can tell you this saves a huge amount of time.
- To run the script run
wget https://git.io/vpn -O openvpn-install.sh && chmod +x openvpn-install.sh && ./openvpn-install.sh1.Fill in the options as needed. -
I did find some things you have to tweak with their script. Perform the below to clean things up. 1.Run
vim /lib/systemd/system/openvpn@.service. Where it says--config /etc/openvpn/%i.conf, change that to--config /etc/openvpn/%i/%i.conf. For details on specifies work see this post. When you are done runsystemctl daemon-reloadto reload the systemd daemon. 2.If you used my version of the script then you do not need to do this. Otherwise you need to runvim /etc/openvpn/server/server.confand you need to prepend/etc/openvpn/server/on several of the paths or the service won't start. See my config below:local 192.168.32.1 port 1194 proto udp dev tun ca /etc/openvpn/server/ca.crt cert /etc/openvpn/server/server.crt key /etc/openvpn/server/server.key dh /etc/openvpn/server/dh.pem auth SHA512 tls-crypt /etc/openvpn/server/tc.key topology subnet server 10.8.0.0 255.255.255.0 ifconfig-pool-persist ipp.txt push "redirect-gateway def1 bypass-dhcp" push "dhcp-option DNS 192.168.1.1" keepalive 10 120 cipher AES-256-CBC user nobody group nogroup persist-key persist-tun status openvpn-status.log verb 3 crl-verify /etc/openvpn/server/crl.pem explicit-exit-notify -
You may want to add something like
push route 192.168.1.0 255.255.255.0to your server config. This allows the server to push routes to the client. For example, in my case the 192.168.1.0/24 network is behind my server, so I have to push a route so that the clients know how to get to it. Just keep in mind, that hosts on your distant network must have a route back to your VPN network. - Run
systemctl start openvpn@serverto start the server. -
Rerun the script to add clients. Your output should look like the below. In my case I added one client to perform the test.
``` Looks like OpenVPN is already installed. What do you want to do? 1) Add a new user 2) Revoke an existing user 3) Remove OpenVPN 4) Exit Select an option: 1 Tell me a name for the client certificate. Client name: test-client Using SSL: openssl OpenSSL 1.1.0l 10 Sep 2019 Generating a RSA private key ........+++++ .......+++++ writing new private key to '/etc/openvpn/server/easy-rsa/pki/private/test-client.key.WONcIB6m1N' ----- Using configuration from ./safessl-easyrsa.cnf Check that the request matches the signature Signature ok The Subject's Distinguished Name is as follows commonName :ASN.1 12:'test-client' Certificate is to be certified until Mar 9 00:13:09 2030 GMT (3650 days) Write out database with 1 new entries Data Base Updated Client test-client added, configuration is available at: /root/test-client.ovpn ``` -
Copy the contents of your client config. In my case this was from
/root/test-client.ovpnand it looked like:client dev tun proto udp remote <SERVER ADDRESS> 1194 resolv-retry infinite nobind persist-key persist-tun remote-cert-tls server auth SHA512 cipher AES-256-CBC ignore-unknown-option block-outside-dns block-outside-dns verb 3 <ca> -----BEGIN CERTIFICATE----- MIIDKzCCAhOgAwIBAgIJANmH49pJjiOUMA0GCSqGSIb3DQEBCwUAMBMxETAPBgNV BAMMCENoYW5nZU1lMB4XDTIwMDMxMTAwMTA1M1oXDTMwMDMwOTAwMTA1M1owEzER MA8GA1UEAwwIQ2hhbmdlTWUwggEiMA0GCSqGSIb3DQEBAQUAA4IBDwAwggEKAoIB AQD5FZJN5STAXRX7ZBq8CVf7DntSQTgnVVqwntKJwggTPHgwn8uMUWRdaIpXZVN5 MYTGPCICDoxdlF/2KUgH9n/L1Rlmm9RW4beXMwFJUR8NIExf5vQy03gk6JpEO1DA Pu+x0/EhXGvGo/lAEpF4rk0ZPpNEkFM71bIqhKAMAe9M5c2ZrAxqplyTz/Zl4nRm YQSsqnx3ikN+SkxdnifIBlF3MzCHqCCV9QaOkrztXHs9XFhnWpyu+OLqyP5+ipOZ gYsTDA4otjv6D9MX+BoWCZ6zSzo/kMSkM7ByZt5jjyp1lQQaYnZe8LmRkB3vcBb4 lWlN8Gu3tvunXSlKJWp7Fh7VAgMBAAGjgYEwfzAdBgNVHQ4EFgQUSDkx6kENF55m RsJZip/xOrv2E2EwQwYDVR0jBDwwOoAUSDkx6kENF55mRsJZip/xOrv2E2GhF6QV MBMxETAPBgNVBAMMCENoYW5nZU1lggkA2Yfj2kmOI5QwDAYDVR0TBAUwAwEB/zAL BgNVHQ8EBAMCAQYwDQYJKoZIhvcNAQELBQADggEBADwKrP9NcTakAbQnd+x+lBzv co0I2XOJrsm6N1r8MKVjEq9Ti5quGtoDLNQDlORnKAaWVzSg6oAFNVrItVJU5GRe J+XI+t2pXqo/OBlVoXcwG52m2rXd9e5wjdmrYwpzijvj//FjjfIZysJJiLW8xSA9 t+3/BCCGqy6uBy2KNvuYMQHr2BdHU05haXtp/mrsalSTlvLFwJeUbHDrqCKoFlDj tXkzcF4sIOfF0dzQXdXT5qerZGOMsXBQ8ALFoHd/wvS5cJvI8nWywEg3w3vWCSO1 zLdcNmvIqYEYrLZBhtLlwBnjKuHSsXorfJsUcmdKsgwIw1KtMBF2bBMyd8twBn8= -----END CERTIFICATE----- </ca> <cert> -----BEGIN CERTIFICATE----- MIIDSTCCAjGgAwIBAgIRAODlLyd7mnQoRNC4oqxJm5AwDQYJKoZIhvcNAQELBQAw EzERMA8GA1UEAwwIQ2hhbmdlTWUwHhcNMjAwMzExMDAxMzA5WhcNMzAwMzA5MDAx MzA5WjAWMRQwEgYDVQQDDAt0ZXN0LWNsaWVudDCCASIwDQYJKoZIhvcNAQEBBQAD ggEPADCCAQoCggEBAOP2megEI8f/e0Xxi6n+EKQwaLZweYFTVg25vT2X6a2HHJfg 8tXznih0NxGJFyITmpl+lddBXEnm/ZqSH6HBGujyd8aWHZ1algvbpyzU0qNXRoAu AjknbkcQ4/m+28/1ocGukY2aKYjQXddp4HzquSQupza/3JcJ+5roWte1PzLZCC74 yfdzhdBwHHOfG4B7SfYOuT7eXQwisCrTFZmtK1FoONhwSlhqcEbMBaEjT9ZP7K7p WSmx82c7xyYhdD4JMZ79qiIm/pbeszu1SpUqd3682mVwmZZOCUWf3pRKwcwEyJnk YKS9ksKTh0F9B9VibfvNw2harR3471qwt6pbSXUCAwEAAaOBlDCBkTAJBgNVHRME AjAAMB0GA1UdDgQWBBTv4I3fmPShB7U6scRReENGsLkiQDBDBgNVHSMEPDA6gBRI OTHqQQ0XnmZGwlmKn/E6u/YTYaEXpBUwEzERMA8GA1UEAwwIQ2hhbmdlTWWCCQDZ h+PaSY4jlDATBgNVHSUEDDAKBggrBgEFBQcDAjALBgNVHQ8EBAMCB4AwDQYJKoZI hvcNAQELBQADggEBACKCvwckhCZ7w5j79gYvRhujm02z2Bah7aggZ9uoyYFw3EVi 1GmyU6aoa3ui2UKciWglm8R21TuhnPsUopbWNniHDlFqOOrVxFST11FD02Qfae8P 6YWhkbUoaS3IwF7NOPg56Q7VaU1P8+GI2fR5kjHrb9pBPTCFX+1gSpiA0TE3DHj4 zO7NFRq+hE17QqeE1+W7pq4uyZYQFpbC6n+VsCJWBXDm/8WR97uJpjWUjFCNPm71 PD5YN6cSa9iasBQVvBWbKkMaf+aFvtLHGteYrVUGkvpnw9DquYFxMnHpwegU4DQh PRL2TL8szw7751o2v2CHZ+zLJbDaq26thdoIh64= -----END CERTIFICATE----- </cert> <key> -----BEGIN PRIVATE KEY----- MIIEvgIBADANBgkqhkiG9w0BAQEFAASCBKgwggSkAgEAAoIBAQDj9pnoBCPH/3tF 8Yup/hCkMGi2cHmBU1YNub09l+mthxyX4PLV854odDcRiRciE5qZfpXXQVxJ5v2a kh+hwRro8nfGlh2dWpYL26cs1NKjV0aALgI5J25HEOP5vtvP9aHBrpGNmimI0F3X aeB86rkkLqc2v9yXCfua6FrXtT8y2Qgu+Mn3c4XQcBxznxuAe0n2Drk+3l0MIrAq 0xWZrStRaDjYcEpYanBGzAWhI0/WT+yu6VkpsfNnO8cmIXQ+CTGe/aoiJv6W3rM7 tUqVKnd+vNplcJmWTglFn96USsHMBMiZ5GCkvZLCk4dBfQfVYm37zcNoWq0d+O9a sLeqW0l1AgMBAAECggEBAKU7AscG6SB3b1R9BWxLeKhpZhyGXat9Sexc6muQhpF+ Ux1KsPiewc40ng2Zvii26OHEvLru5wOx57N3onHN08FwrZxFBmYdWJBzvzJhd+No yPLzZi0jBW2BMpy81/pd4cbOzzVBvkUqMjqGxW4Fe/hb0FuAqVTYqYPYUq/y8UHa atIehY3jNc46pSRmmFIDDdyh6K5lmFVZntpRKg9RzUibQxBkLZZwnRwFLf58wJbr Os9OT2QZsaSDIIK4mtL3xTVbT9ORC/ADY6XXO+Yb6IyLqD6WD5Yqh7wEpp/Gv4Ob BvlObULOEZnjeAK9FIPs9gFuimBjcJK5kX3an8yok6kCgYEA/cqQIMR8ORRdTBaj v2CK8RtQOJ2VPEpINcxPHK8vh38CrKNmCjETXqhkCwI1wOT/WKA4IUHBLfOhgC00 cHYn6k2JfossQGh8DvjyY+JtdmSamzeecQ4i13RcnSj5G+kY/iEQogTaSALpB1Uo cugU116HiHSvcz+FK3Ia4lAHnjcCgYEA5fJ+lg3lCCd1Cq4UpzGWLMWpo5VBX9Eu QhWRC2uIGkO4BAXVlkU/1TOvzonfoHLcyVUlLjE//p6djyVezkdVHTYYXQwrWIYE oinC4YnxV1Pcvii7WaBw9t3s5REYdgyvT0Wh7GIm+o6TMnfBTvVV/DMU6K9z59f+ wLXfMZaZH7MCgYBOXhdlVub5BTXOAgusU9ZznziFUvu7M0DbA+zF8b6ee3TK9GXU 7dSKXTsPPy50EwJaTpcmhdRuKRYMq2jO9V1b93dmkPkoJltwkCTg/RFKBsTK+0C8 rl3J5A+ZJAbQPIlQJ8uoDBGPPP7SGdS0rr+IxZLaaxWmY83uXXy5t3ayvwKBgQCM YMrovljI7pWkTHvtSfddI9qZNAAyB5jO3S2sJBx1tEu9oPYwg9whQymb1E3CPP0O qD1HgueHgLu9bNoA4klSyPh8rXY017Qyb346hCTi5B6JtIITiEAOZZM+kH43ay0H HwJoNc+H/Mxd7gAEPQAeM+0a1CnVKuaqLR2xvzeBwwKBgC+vydOv2Fqu58b+/cWi 52/stI11Y+xkdQ+/SP+cAucN05xVrfFzEbv90/Tintk2G+oCb5lWxM2uGIfSMCMA CUHg03a0oZdTTapUs+i0fahuhR/ojK5i4COTHM0jF3ryr1Gjo0RUgbJe/RlnRY5v bbOS07Ao554/jPNrXGzImnQz -----END PRIVATE KEY----- </key> <tls-crypt> -----BEGIN OpenVPN Static key V1----- 470a961d29e78b8f4884b46741587ecf 6008c6bb16acf2eae299f68df994133d 7fbe5dbacd187c21ac9e61bc2aab3de0 c88f39674dec40ef4844dddb80884ad4 652542876fdadd98ca95cf4e9f4ed6e8 2b2f6315aa77c0ae9fc5dca6df687622 82f629e230990b340b1b95f6f7ca18a4 185176cf29c04d5d0a9f9c19083fe3b6 24e55a25f5e5ccf2a48f33373d56792a 20f60074f9e6ef855e0b0ceca0a07300 294718d41af0a97da641053397fdc944 d21f5a9a702a118de21440fce772ab17 11a575acc9ce0097e2fdefc1233ea2e6 01e49032eaf2aa3e0898c3f5b334839f f8c69c80614a45cfb0ba7d43d3476e37 a22a4d43b0dbc96430b1115a6b1f6aac -----END OpenVPN Static key V1----- </tls-crypt> -
NOTE: The script automatically accounts for NAT. Notice in your client config that it sets the remote server as whatever your external address is. You may not want this behavior. If that is the case you will need to go in and edit the
remoteline with the IP address of your VPN server.
On CentOS 7
- Make sure everything is up to date.
yum update -y && reboot. The reboot is important because if your kernel might update. If this happens you need to reboot to load the new kernel. - Run
yum install -y epel-release && yum update -y && yum install -y openvpn easy-rsa chrony && systemctl enable chronyd && chronyc makestepThis is a long series of commands, but it installs openvpn and chrony. You need chrony to ensure your time is synched. WARNING: If the time is not synched between the server and your clients, the VPN will fail to connect! - You should have copied your client config to your client already. If you haven't, do that now. To run the VPN, run
openvpn <client_config_name>